
If you want to run SD Remix on a Wii, you will need the Homebrew Channel installed on your Wii. As the Homebrew Channel is not officially sanctioned by Nintendo, you can’t just download it from the Nintendo e-shop. However, there are plenty of ways to install it, so you’ll likely be able to install it no matter what your situation is.
We’ll go over two of the methods that will likely work for the vast majority of smashers, but if you want to try one of the other methods, the other methods are described on this wiki: http://wiibrew.org/wiki/Homebrew_setup
The two methods we will describe are Smash Stack, which uses a copy of Super Smash Brothers Brawl, and is the easier of the two methods, and LetterBomb or Wiibrand, which exploits the message board.
Click here to use the Smash Stack method.
Click here to use the LetterBomb/Wiibrand method.
Method 1: Smash Stack
This uses the same exploit that Project M team recommends to use to play Project M, except instead of loading Project M, it installs the Homebrew Channel. A benefit for Project M players is that once you have installed the Homebrew Channel, you can start Project M directly from the Homebrew Channel instead of having to go through Brawl’s menu and having to load Project M that way. After installing the homebrew channel, you can also restore your custom stages onto your console, as you won’t need to have an empty stage builder to load Project M anymore.
Official instructions here: http://wiibrew.org/wiki/Smash_Stack
Before you get started you’ll need:
- The HackMii installer: http://bootmii.org/download/
- The SmashStack files, depending on your country, which can be found here: http://wiibrew.org/wiki/Smash_Stack (If you live in the USA, you will want the regular version, NTSC-U, which is located here: http://wiibrew.org/w/images/4/4e/Smashstack.zip)
- An SD card that is 2GB or less (Brawl cannot read any SD card that is bigger)
- A copy of Super Smash Brothers Brawl for the Nintendo Wii
- A Wii
Step 1: Move all custom stages from console to your SD Card
The exploit only works when you have no custom stages, including the three samples that come with a new file or stages from the Smash Service. Because of this, you’ll need to move all of your custom stages to your SD card. Put your SD Card into your Wii’s SD Card slot, put Brawl in your Wii, start up Brawl, go to the Stage Builder, and move all of your stages on your console to your SD card.
Step 2: Prepare your SD Card on your computer
Connect your SD Card to your computer. Open your SD in your OS (it should be in “Computer” or “My Computer” on Windows, or in Finder on Mac).
If you did step 1, you should see a folder called “private”.
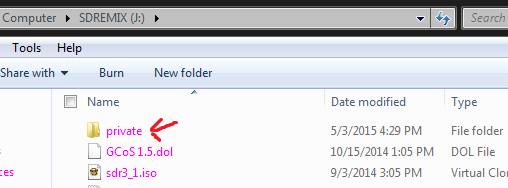
This is where all of the custom stages went, and is effectively your backup of the custom stages. You will want to rename it. We recommend renaming it to “private_old”, or something along those lines.
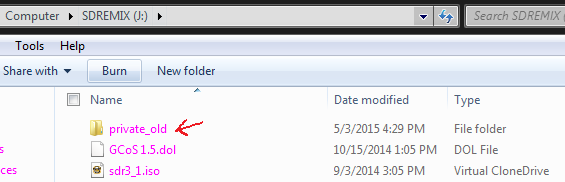
The Smash Stack zip file you downloaded should have a “private” folder. Extract this to the root of your SD Card (or, the same place that your “private_old” folder is located).

The HackMii Installer zip file should have a folder called “hackmii_installer_v1.2”. Go into that folder and your should see a bunch of files, one of which is boot.elf.
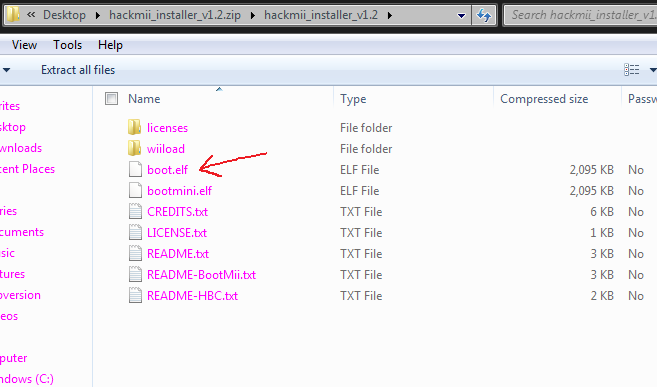
You will want to move that file to your SD Card’s root.
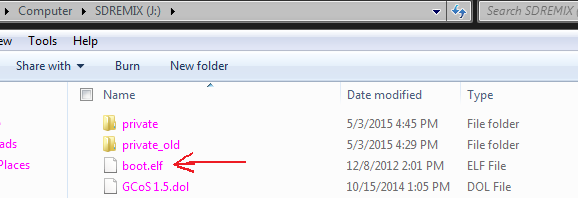
You are done preparing your SD card, and can remove it from your computer.
Step 3: Installing the Homebrew Channel onto your Wii
Insert your SD Card back into your Wii and start up Brawl one more time. Navigate back to the stage builder.
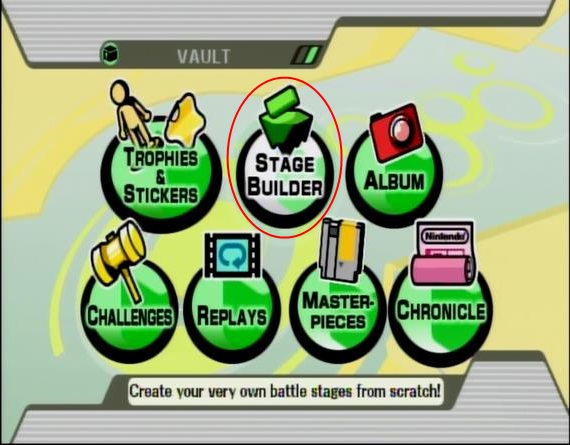
Select the stage builder. If everything is going right, you should see this screen:
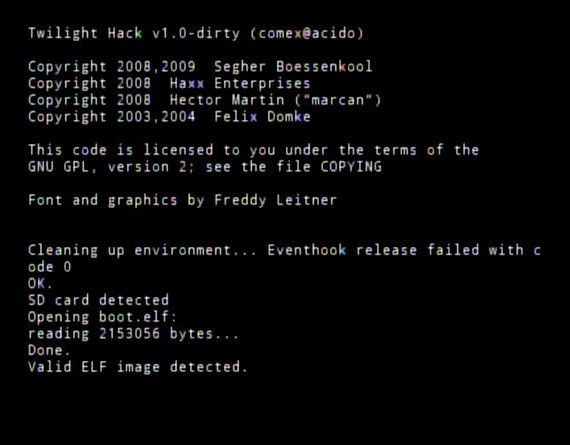
Let it finish loading. After it’s done, you will see this screen:
This is the HackMii loading screen. It might take a while for it to finish loading. Once it does, it’ll ask you to “Press 1 To Continue”. When this happens, press 1 on your Wiimote to go to the next screen:
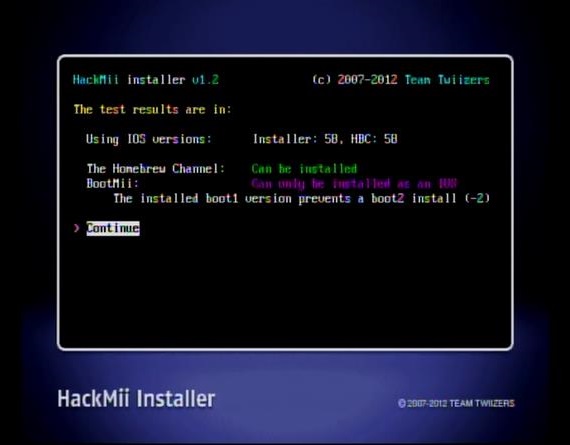
As you can see, it says you can install the Homebrew Channel. Depending on your Wii, you might also be able to install BootMii, which is outside of the scope of these instructions.
Press “A” on the Wiimote to continue. You’ll come to this screen:

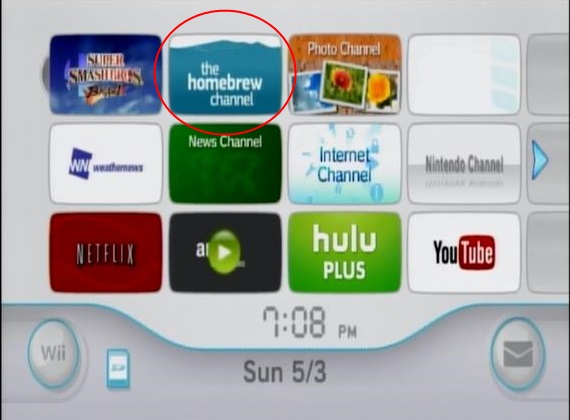
At this point, you will want to navigate to “Install The Homebrew Channel” with the D-Pad on your Wiimote and select it using the “A” button. It will then install the homebrew channel onto your Wii. After it is done, exit the HackMii Installer by navigating to “Exit” and pressing “A”. It should take you directly to the homebrew channel. Don’t worry if nothing is in the homebrew channel, as you likely haven’t put any homebrew software on your SD card. To start the homebrew channel the next time you log in, you can simply select it from your home screen:
Method 2: LetterBomb/WiiBrand
If you don’t have a copy of Super Smash Brothers Brawl handy, you can use the LetterBomb or WiiBrand exploit instead.
Before you get started you’ll need:
- A Wii
- An SD card or SDHC card
Step 1: Make sure your SD Card is FAT16 or FAT32
On Windows, after connecting your SD Card to your computer, you can go to “Computer” or “My Computer”, right click on your SD Card and select “Properties”. It will bring up this window:

The part circled, and it should say “FileSystem: FAT32” or “FileSystem: FAT16”. If it doesn’t, you’ll need to reformat it (this will wipe everything on your SD Card, so back up everything you want to save to somewhere you’ll remember on your hard drive). To reformat, you should go back to “My Computer” or “Computer”, right click on your SD Card, and select “Format…”. You should get this window:

Make sure the portion circled says “FAT32” or “FAT16” (preferably FAT32). Then click “Start” to reformat your SD Card. Again, this will delete everything on your SD Card, so make sure you’ve backed up any important files.
Step 2: Get your Wii’s System Menu Version Number
In order to use LetterBomb, your Wii’s System Menu must be at Version 4.3. WiiBrand works with a variety of versions. To check your version, go to your Wii Options from the Wii’s main menu, like so:

Then go to Wii Settings:

Your version number will be displayed on the top right corner of the screen. If you have the latest version, which is 4.3, it should say “4.3U” (for America), “4.3E” (for Europe), “4.3J” (for Japan), or “4.3K” (for Korea). If you have any other version, it will say so here.

Step 3: Get the MAC address of your Wii
To find your Wii’s Mac address, you’ll need to turn on your Wii and go to the Wii Options:
Then go to Wii Settings:
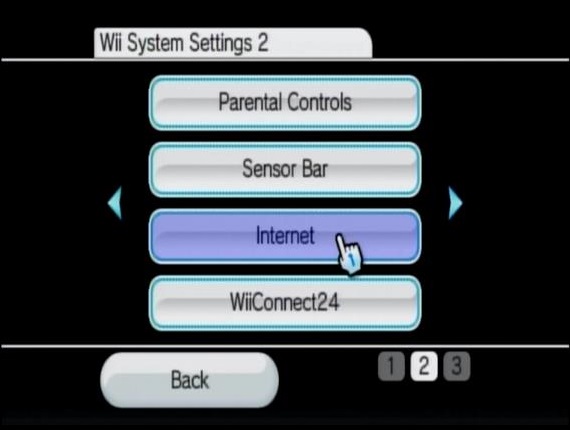
Then go to the second page and select Internet:
From there, select Console Information:
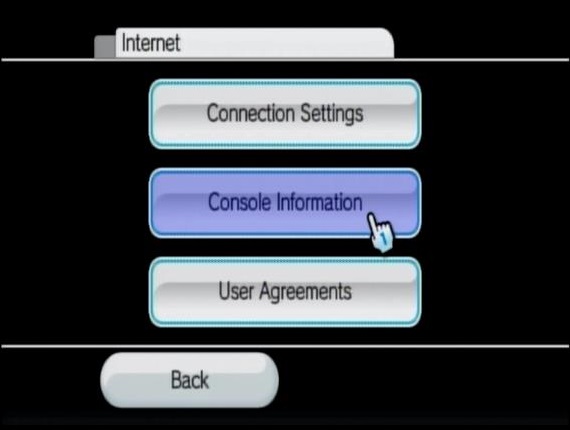
The next screen should have your MAC Address and possibly your LAN Adapter MAC Address. Your Wii’s MAC Address is the first one, simply labelled “MAC Address”.
Step 4: Prepare your SD Card
First, connect your SD card to your computer. This step will overwrite your existing “private” folder on the card, which is where the Wii stores data, if it stores anything to the SD card (so you may not have a “private” folder if your Wii has never saved anything to it).
If you want to keep this data for later, you’ll need to rename it. We recommend renaming it to “private_old”.
If you have version 4.3, you should use Letterbomb, since it’s marginally easier to do. If you don’t have 4.3 or if the Letterbomb website is down, you can still use WiiBrand pretty easily.
To use Letterbomb, go to http://please.hackmii.com/. Once there, select the correct System Menu Version region (one of the radio buttons). Then, you will need to input your Wii’s MAC Address into the text boxes provided. Make sure “Bundle the HackMii Installer for me!” is checked. Fill out the captcha and you can cut either the red wire or the blue wire (it doesn’t matter). At that point, it’ll give you a file to download called “LetterBomb.zip”. Download it to somewhere on your hard drive. It should contain a folder called “private” and file “boot.elf”. Copy these to the root of your SD Card.
To use WiiBrand, download the WiiBrand Launcher from this web page: https://gbatemp.net/threads/wilbrand-launcher.328943/
Extract the exe and two dlls to the same folder on your hard drive. Launch Wiibranch_Launcher.exe. You’ll get the WiiBrand Launcher window. Enter in your Wii’s Mac address, which region it is, the Firmware version number (which is the same as the System Menu version number), make sure “Bundle HackMii installer [version] for me” is checked, and check “Copy directly to device”. From the drop down next to “Copy directly to device”, select your SD Card. Once that’s done, click the button with the green envelope with the pink bob-omb. Once it is done, there should be a message below the button that says something like “OK! Data copied to device ‘[SD Card Drive Letter]:\”.
Whether you used LetterBomb or WiiBrand, your SD Card should now have a “private” folder and a “boot.elf” file.
You can now disconnect the SD card from your computer.
Step 5: Trigger the exploit on your Wii
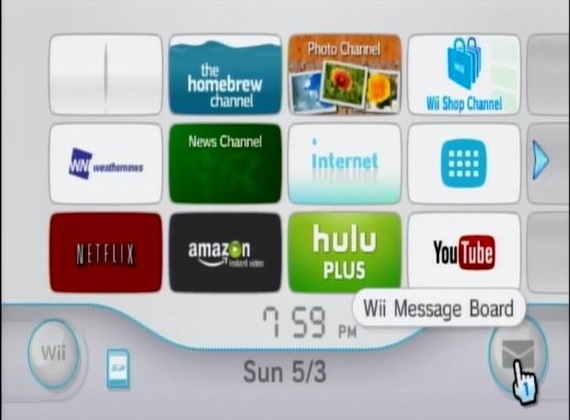
Insert the SD Card into your Wii’s SD Card Slot. Then turn on your Wii. From here, go to the Wii Message Board.
From there, navigate either to today, yesterday, or tomorrow until you find a message that looks like a colored envelope. If you used WiiBrand, it will be a green envelope, and if you used Letterbomb, you’ll see a red envelope, like this:

Click on it, and you will have hacked your Wii. The next screen should look like this:

Note: If it just hangs, the bundled “boot.elf” may be inadequate or corrupted. In that case, you’ll need to go to the HackMii Installer webpage and download it directly from that website. Once you’ve got the zip file, open it up and navigate until you find a file called “boot.elf”. Extract this to the root of your SD card (overwriting the existing broken one) and try this step again.
Let it finish loading. After it’s done, you will see this screen:
This is the HackMii loading screen. It might take a while for it to finish loading. Once it does, it’ll ask you to “Press 1 To Continue”. When this happens, press 1 on your Wiimote to go to the next screen:
As you can see, it says you can install the Homebrew Channel. Depending on your Wii, you might also be able to install BootMii, which is outside of the scope of these instructions.
Press “A” on the Wiimote to continue. You’ll come to this screen:
At this point, you will want to navigate to “Install The Homebrew Channel” with the D-Pad on your Wiimote and select it using the “A” button. It will then install the homebrew channel onto your Wii. After it is done, exit the HackMii Installer by navigating to “Exit” and pressing “A”. It should take you directly to the homebrew channel. Don’t worry if nothing is in the homebrew channel, as you likely haven’t put any homebrew software on your SD card. To start the homebrew channel the next time you start your Wii, you can simply select it from your home screen:

Ok so I did all this but how do I use project M on It?
LikeLike
You’ll need to install Project M. We are not affiliated with Project M, so we do not have any downloads to it.
LikeLiked by 1 person
you are a saint!!!
LikeLike