
This guide supports SD card or USB drive installation. Melee: SD Remix can also run off a burned disc and even the Dolphin emulator, but those methods aren’t covered in this guide.
This guide assumes you are using a Nintendo Wii (with Gamecube backwards compatibility) to run SD Remix and that you ALREADY have Homebrew Channel installed. If you don’t go here for instructions on how to install the Homebrew Channel.
It also assumes you’ve never installed any cIOS onto your Wii. If you have, then you probably don’t need to consult this in the first place.
What You’ll Need
What you need prior to the instructions outlined in the guide:
- A Wii with Gamecube Backwards compatibility.
- The Homebrew Channel installed (if you don’t click here for instructions)
- A 2GB+ SD Card formatted to FAT with 64kb file allocation or a 2GB+ USB storage device formatted to FAT32 with 32kb file allocation.
- A Wiimote (for WAD Manager) {Sensor Bar isn’t needed}
- An ISO of Super Smash Bros. Melee (any version of NTSC-U) {Use Google, or a Wii backup tool, like CleanRip}
- A computer with Windows installed, or a Mac/Linux machine that can run windows programs such as via Wine (Wine usage is outside of the scope of this guide)
- Some homebrew applications and files compiled in “STEP 1”
STEP 1: SD Card/USB Preparation
If you haven’t already, back-up your files on the:
SD card and reformat it to FAT with file allocation at 64kb. It can be Quick Format.
or
USB device reformat it to FAT32 with file allocation at 32kb. It can be Quick Format.
To reformat on Windows, connect your SD Card or USB device, go to “Computer” and right click your SD Card or USB device. Then click on “Format”. The window should look like this:

The part circled in red is your file system, which is either FAT or FAT32 (if your SD Card does not support FAT, you can use FAT32, as long as you use the correct Allocation Unit Size).
The part circled in green is your file allocation size. Make sure this is “64 kilobytes” for SD Cards and “32 kilobytes” for USB Devices. THIS IS VERY IMPORTANT! If you don’t do this, DIOS MIOS will NOT be able to read SD Remix’s game data.
Next, download this .zip file: http://www.mediafire.com/download/k1ka875879o6otu/dios_mios_stuff.zip
Unzip the file and you’ll see three folders (apps, dml, and wads) plus one .wad at the root.
Copy the apps and wads folders and the .wad to your SD card/USB root directory. Say yes to any and all file replacement inquiries in this step. Your SD Card or USB device should now have an “apps” folder, a “wads” folder, and the .wad file from the zip file.
Now the dml folder should be copied to your C:\ drive. You’ll see why in a moment.
Okay, remember that Melee ISO you legally obtained? Patch it into an SD Remix ISO. See ISO Instructions. Once you have the SDR Iso, copy it to C:\dml
It’s in there? Great! Now rename the ISO to ‘ssbm’. Chances are your ISO has spaces in the name, which will greatly complicate the next step.
The contents in “C:\DML” should look something like this:

Now assuming you’re using Windows, open up Command Prompt (CMD.exe). On Windows 7 and up, you can go to the start menu and type in “Command Prompt” to get to it. It’ll look like this in Windows 7:

Select “Command Prompt” to open it.
In the Command Prompt, type in
c:
Press enter, then type
cd c:\dml\
Press enter, then type
gcreex -x (sdr iso name + file extension)
Example: I have an SDR ISO called “ssbm.iso”, so on this step, I would type in: “gcreex -x ssbm.iso”. If your ISO is called “sdr.gcm”, you would type in “gcreex -x sdr.gcm”. Your command prompt should look something like this:

Now press “Enter” to start the process. It’ll begin to extract the files into a folder called “SDRE32” in C:\dml\. This will probably take around 10 minutes or slightly less. When it is done, it will look something like this:

Your c:\DML folder should now have a “SDRE32” folder.
Then, you will need to copy this “SDRE32” folder into the “games” folder in the root of your SD card/USB device. You will need to navigate to your SD Card/USB device and create a “games” folder:

Go into that folder, and copy over your “SDRE32” folder from your C:\DML folder into the “games” folder.
STEP 2: Wii Installation
Place your SD Card into the Wii’s SD slot, boot up Homebrew Channel, and then proceed to load the IOS236 installer.
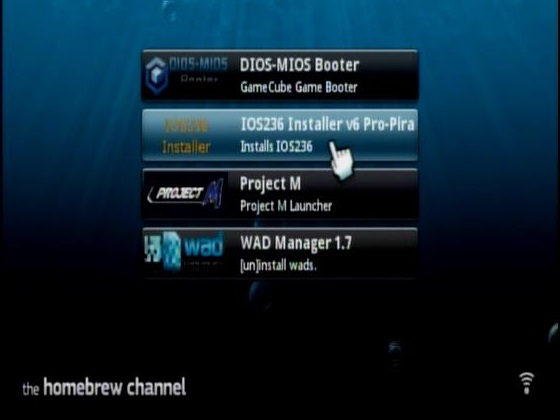


Follow the directions on-screen and install it. Choose the option to load IOS236 from where you placed the .zip files (either a SD or USB device). Proceed onward until you are back on the Homebrew Channel screen. Congratulations, you now have a customized IOS236!
Next boot to WAD Manager.

You are REQUIRED to use a Wiimote for this program.

Press “A” to continue. When it prompts you for which IOS to use, select IOS 236.

The storage media is your SD card:

or USB Storage Device:

If everything checks out, you should see a menu of your device’s root:

Go to the ‘wads’ folder:

Press “A” to go into that folder:

Now we’re going to install some .wad files. First select ‘cIOS249[56]-d2x-v8-final.wad’. The screen should now look something like this:

Follow the on-screen instructions to install it. It will confirm your success.
Next, do the same for ‘cIOS250[57]-d2x-v8-final.wad’
Then, install the “[SD] DIOSMIOSLite_2.10.wad” file (for SD cards) or “[USB] DIOSMIOS_2.10.wad” (for USB devices). NOTE: If you receive error messages while trying to install this DIOSMIOS .wad, exit the program, reboot WAD Manager, and select IOS 249 instead of IOS 236. When it asks you for NAND Emulation, choose Disabled. Now choose your storage device and try again.
You should be done, so go back (press “B”) until you’re back at the first screen. Exit using the Home button, and it should tell you it’s restarting the Wii:

It should take you to the Homebrew Channel when it’s done.
STEP 3: Running Melee SD: Remix!
You will now be able to run SD Remix using the DIOS-MIOS Booter. Go to the homebrew channel and load the DIOS-MIOS Booter application:

The DIOS MIOS menu should show up. Make sure that your current device is correct:

If it is not, press Minus on your Wiimote or “L” all the way down on your Gamecube controller to switch to another device:

Once you have the right device, you should see SD Remix as a choice in the loader. The name it is under can vary depending on if you’ve used one of our optional files or not, but it will either show up as something similar to “Super Smash Bros Melee” or “Super Smash Bros SD Remix”. You can use a Gamecube controller to control this loader’s menus if you wish instead of the WiiMote, though only the DPad works for navigation.
Pressing ‘B’ will take you to the Options menu, which you can switch pages with L/R or -/+.

Change pages until you get to the third page:

You should see a ‘No Disc Patch’ option. Verify it is enabled (set to “On”) and please eject any disc you have inside your Wii drive. Additionally, if you have a widescreen TV, you can also enable “Widescreen” to play SD Remix in widescreen.
Now go back to the main screen on the loader and select Melee: SD Remix (or whatever it is called for you):

The Wii should go to a Gamecube logo screen with “DIOS MIOS” printed underneath the logo or something similar and the disc drive should make a noise like it just accepted a disc.

Then the screen will black out for 5 or so seconds at most. If you’re lucky, the installation was successful and you can start playing SD Remix!

Otherwise, continue to Step 4.
Step 4: Troubleshooting
Chances are, the loader froze at or after the apploader screen, right?
If it’s freezing, try removing all special peripherals connected to your Wii and try again.
If it’s still stuck, put your media device back onto your computer, select the ‘dm-loader’ folder, and delete it. It’s possible the DML-Booter configuration file became corrupt.
If that’s still no good, go back to WAD Manager, load up IOS 249, uninstall the DIOS MIOS .wad you originally installed (scroll right of ‘Install’ for ‘Uninstall’), then install ‘RVL-BC-v6.wad’ and ‘RVL-mios-v10.wad’ in that order.
Then reinstall the DIOS MIOS .wad you originally chose. This process is basically us cycling through a ‘corrupted Gamecube Mode’ -> ‘clean, vanilla Gamecube Mode’ -> ‘Successful DIOS-MIOS-(Lite) installation’ until it works.
And you did format your SD card correctly, right? If it’s not FAT or FAT32 with 64kb file allocation, it won’t work. Ever.
Alternatively, did you format your USB device correctly? If it’s not FAT32 with 32kb file allocation. That won’t work either!
